You've got a family photo worth printing, except for a stranger's bicycle behind your child. Or your product shot is ready for the shop, apart from a stray cable crossing the table. Image editing with AI can clean up either distraction, but a convincing preview isn't the same as an approved photograph.
The safest approach is to treat each edit as a reviewable change: protect the original, limit what the tool can touch, inspect the result, and record what you approved. You don't need a complicated production system. You need a clear instruction and a reliable way to catch changes you never requested.
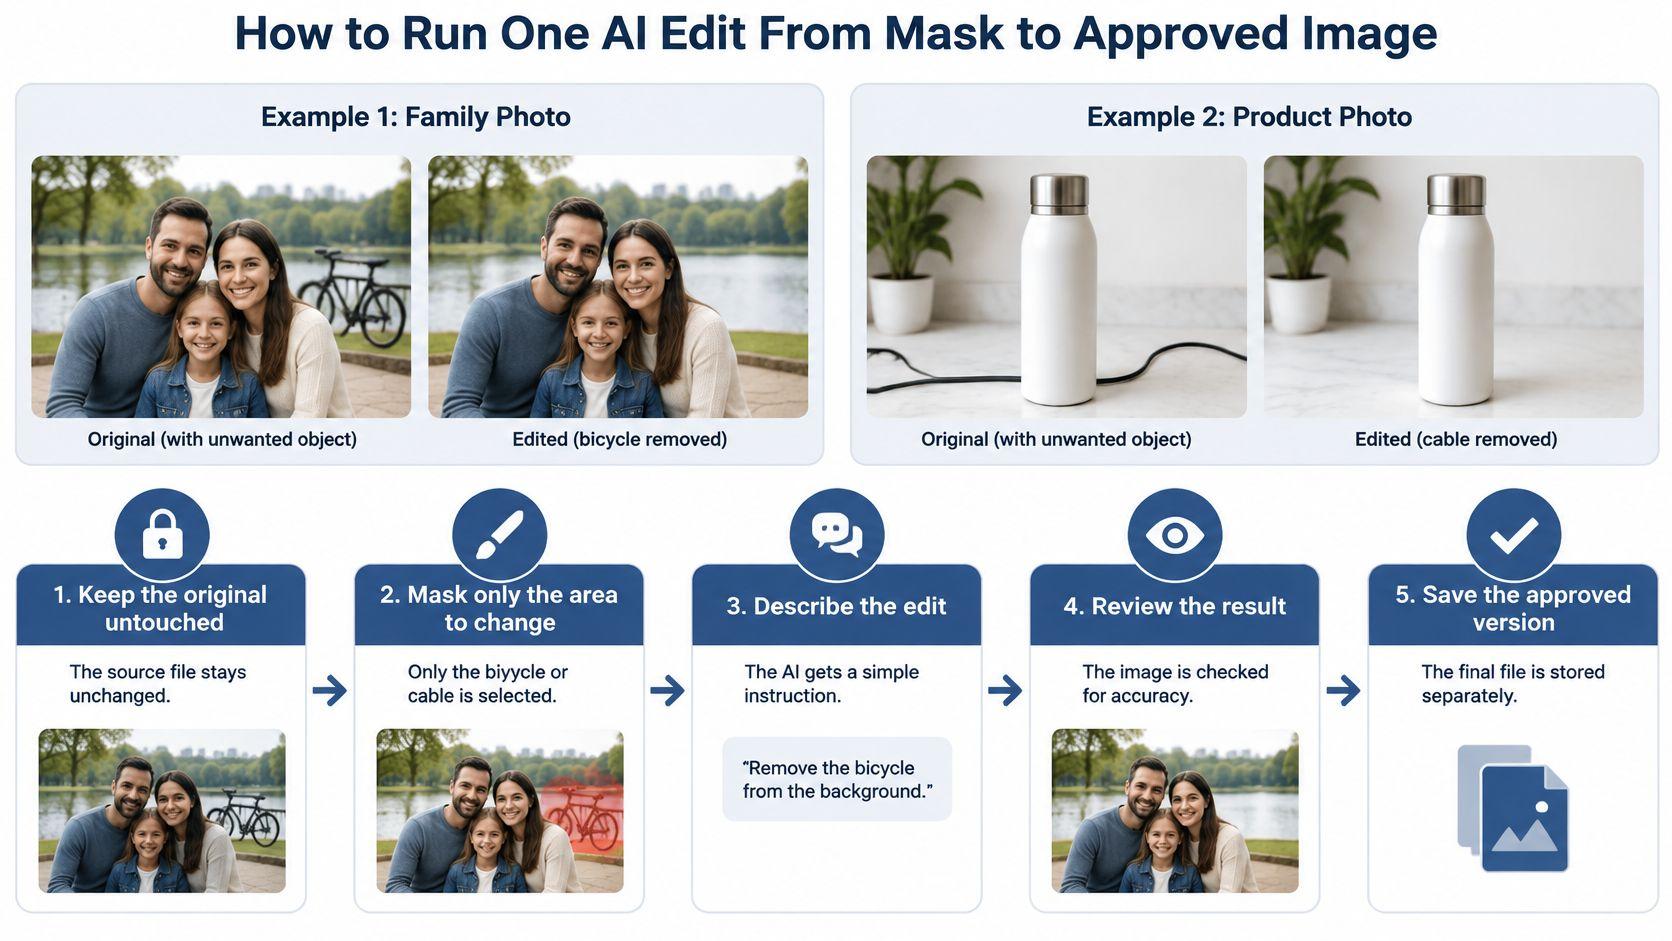
How to Run One AI Edit From Mask to Approved Image
Say the bicycle sits on plain pavement, away from your child's outline. That's a sensible removal task. The cable is similarly straightforward if it crosses an empty tabletop, but harder if it overlaps the product label or a reflective surface.
Choose the smallest useful correction rather than asking the tool to improve the whole photograph.
Prepare and constrain the edit
- Keep the original untouched. Duplicate it into a working folder named by date and job. Keep the source outside the tool's export destination so an ordinary save can't replace it.
- Choose selection or mask controls. A tool such as Photoshop's Generative Fill lets you identify an editable region. Prefer that control over an unmasked instruction that gives the system permission to reinterpret the entire image.
- Write a bounded instruction. Include the operation, target, location, replacement material, and protected detail. For the family photograph, request removal of the blue bicycle on the left, replacement with matching pavement, and preservation of the child's face and existing lighting.
- Draw a tight mask. Cover the bicycle, including its thin spokes and handlebars, without sweeping across the child. Leave enough surrounding context for a clean join. A mask that's too narrow can leave fragments; an oversized mask exposes unrelated details to regeneration.
Review before exporting
- Generate several candidates. Keep the source and instruction unchanged while comparing alternatives. Otherwise, you won't know whether the prompt, mask, or random variation improved the result.
- Inspect at full resolution. Look inside the repaired area and around its boundary. A phone preview can conceal repeated pavement patterns, fuzzy edges, and fragments of the removed object.
- Compare with the original. Reject candidates that alter an unnamed face, label, object, or structural line. The image-editing evaluation paper in the International Journal of Computer Vision distinguishes instruction fidelity, visual quality, and preservation, which are separate approval questions rather than interchangeable signs of success.
- Save the approved version separately. Record the tool and prompt beside the export. For product-specific workflow ideas, Photo Speak's guide to editing commercial photos with Photo Speak provides a useful companion to this controlled approach.
Approval check: The target is gone, the boundary is invisible at full size, and the lighting and shadows still agree with the scene.
Edit Types, Realism Ratings and Prompt Patterns
A family portrait and a product shot need different kinds of edits. Removing an object means rebuilding what was behind it. Changing an attribute means preserving the object's identity while altering one selected feature, which can make the result less convincing.
In the generative-photo-editing study, mean realism ratings were higher for removals and canvas extensions than for attribute modifications. These scores compare edit types within that study; they do not predict how a particular image will turn out.
Edit types, realism and prompt patterns
| Edit type | Reported realism (study scale) | Prompt pattern | Main risk |
| Object removal | 4.29 | Remove [object]; fill with [matching texture]; keep [protected detail] unchanged | Leftover shadows and reflections |
| Canvas extension | 4.38 | Extend the [left or right] edge with [matching surface]; match horizon and lighting | Perspective and horizon mismatch |
| Attribute modification | 3.24 | Change [one attribute] of [target] to [value]; keep [face or structure] unchanged | Identity drift and misleading changes |
| Background replacement | Not rated in that study | Replace the background with [setting]; keep subject edges and hair detail | Edge halos and lighting mismatch |
| Old photo repair | Not rated in that study | Repair [damage type] only; do not alter facial features | Invented detail on faces |
Make the preservation clause specific
Name the details the edit must protect. For a bottle photograph, specify the label lettering, cap shape, and liquid level. For a canvas extension, protect the horizon and the slope of an existing roof.
Keep each request to one type of change. Combining a shirt recolour, facial adjustment, and background replacement makes it difficult to identify why a result went wrong. If a selection and adjustment layer can change the colour without synthesising detail, use that instead.
Expression edits call for particular care. Before trying to fix awkward expressions in family photos, consider whether an expression from another photograph would be preferable to a generated one, and get the person's agreement.
For background replacement and old-photo repair, test on a copy. A sharper eye or clearer tooth can look plausible while adding detail that was never present. Keep the unenhanced original, and log the prompt and approved changes so the edited image remains explainable.
Where AI Edits Fail and How to Fix Them
In a generative-photo-editing user study, 16 of 133 edit requests, or 12.0%, were classified as unsuccessful, and participants reported inconsistent handling of people and failures to follow prompts strictly, according to the ACM study. That study also provides the realism comparisons used above; its results describe those participants' tasks, not a universal failure rate.
Start troubleshooting with the visible symptom. Rewriting a longer prompt won't repair a poorly placed mask.
Edit symptoms, likely causes and fixes
| Symptom | Likely cause | Fix |
| Target object still visible | Mask too narrow or prompt too vague | Widen the mask slightly, identify the object by colour and position, and regenerate |
| Soft halo along the edge | Mask too wide or boundary blending | Narrow the mask and regenerate at full resolution |
| Face or hands changed | Sensitive region inside the edit | Restore the original, exclude sensitive regions, and make any intended change separately |
| Shadow or reflection missing | Shadow lies outside the mask | Add a separate, narrow edit for the shadow or reflection |
| Garbled text or logo | Text inside the edited region | Keep lettering outside the mask; restore authentic artwork or retype accurate text in a layout tool |
| Patch looks flat or pasted | Lighting or texture mismatch | Regenerate with an explicit lighting and texture clause |
Inspect relationships, not just surfaces
A clean-looking patch can still be wrong. Follow a table edge through the repair, check whether tiles retain their spacing, and compare a reflection with the object that should produce it. For product images, read the label rather than merely checking whether it resembles text.
Treat people, faces, hands, text, and logos as protected regions unless they're the explicit subject of an authorised edit. If an untouched hand changes shape, reject the candidate rather than accepting the improvement elsewhere.
A polished image that fails the requested task is still a failed edit.
Use a second reviewer when a result is uncertain or commercially consequential. Ask that person to check object presence, identity, geometry, shadows, reflections, lettering, and edge continuity against the original. Give them the requested change, not just the finished image, so they can distinguish an intentional alteration from an accident.
When AI Edits Need a Disclosure Label
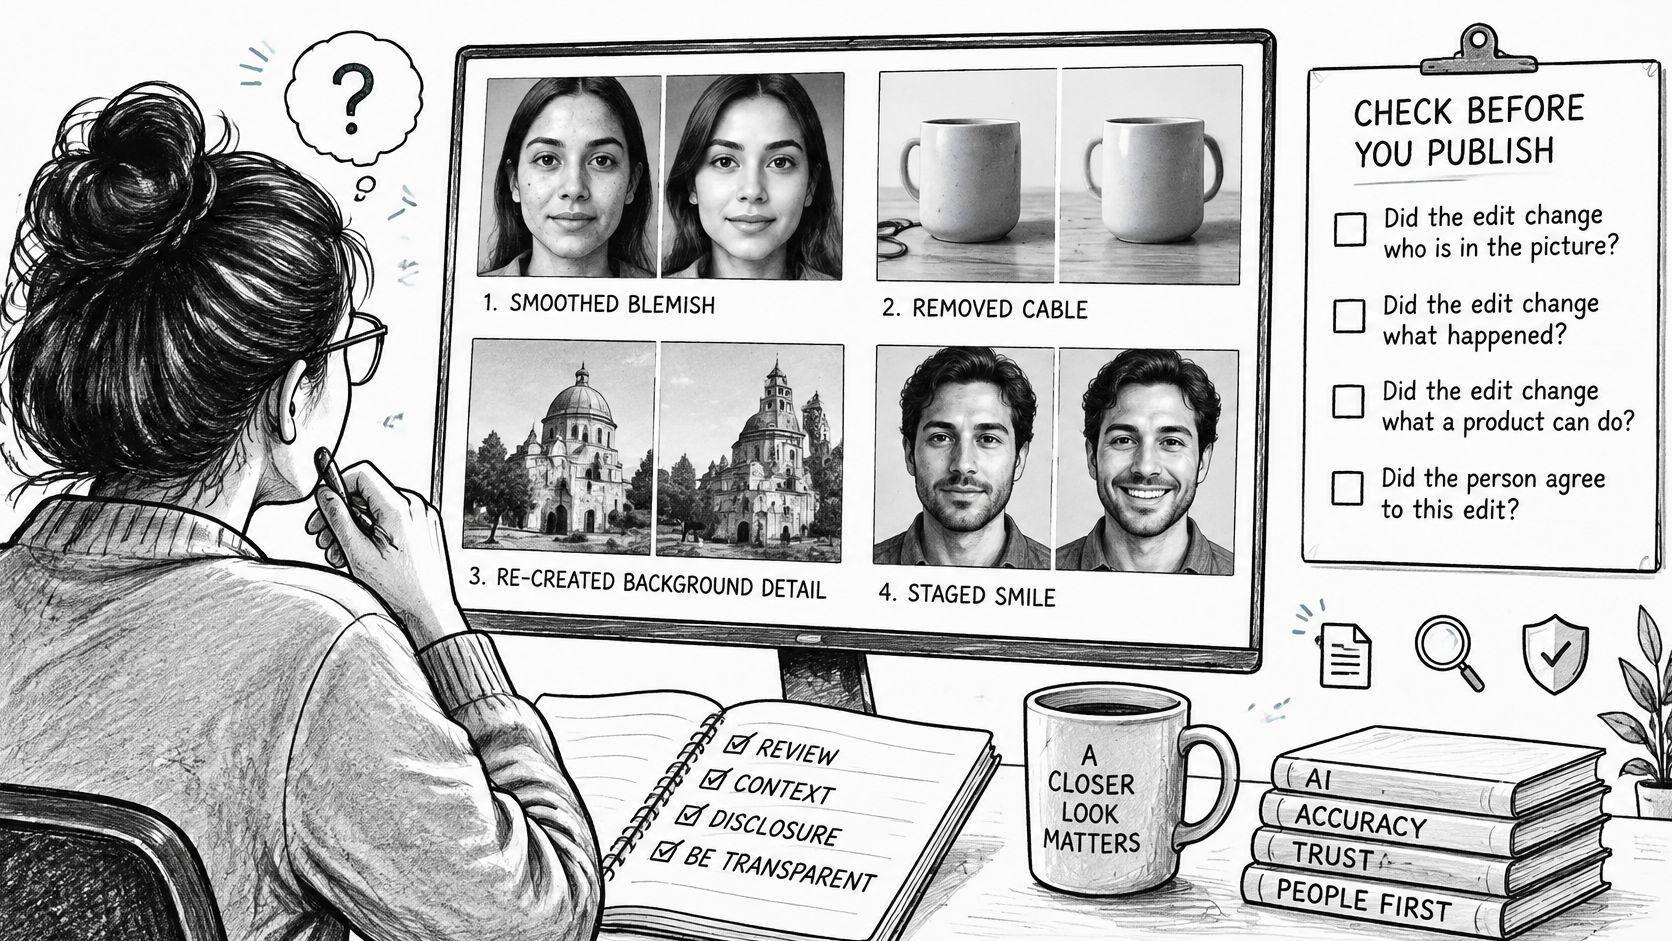
Does the edit change who was there, what happened, what a product can do, or whether someone agreed to the depiction? If it does, a technically clean result may still mislead its audience.
Judge meaning before technique
- Removing a blemish: Usually a cosmetic change in an ordinary portrait. It becomes materially different if the image is offered as evidence that a skincare treatment worked.
- Replacing a grey sky: A creative adjustment for a personal print, but potentially misleading in documentary coverage or an advertisement implying actual conditions.
- Changing a product's colour: Don't present a generated colour as a purchasable variant unless it accurately represents the item. Label a concept mock-up as a concept.
- Restoring an old family photo: Describe reconstructed facial detail as an interpretation, not recovered evidence.
- Inserting a person: Explain that the group image is a composite. Their apparent presence shouldn't be mistaken for attendance.
Rules also differ by jurisdiction. The Securing AI overview of content-marking requirements describes China's 2025 rules requiring visible and machine-readable labels, alongside EU obligations concerning detectable marking and disclosure for certain synthetic or manipulated content. These are not blanket rules for every retouched photograph; check the applicable requirements before publishing.
Keep provenance metadata where available, together with the original and a record of changes. Metadata doesn't prove accuracy, ownership, consent, or appropriate context. A plain-language explanation of the actual alteration can be more useful to the viewer than a generic AI badge.
Consult the usage policies when assessing permitted uses, but don't confuse platform permission with advertising, privacy, or disclosure compliance.
Small-team rule: Disclose any edit that could make a customer or parent believe something false.
Consent and Privacy Rules for Families and Small Teams
AI tools can create intimate images of real people without their consent. Set permission before uploading any recognisable person, including what you plan to change and who may see the result.
Owning the original photo does not settle every permission question. Permission to take a picture, upload it to a service, edit it, and publish the result are separate decisions. Keep the original unchanged and record the approved edit and its purpose.
Set boundaries before uploading
- Get explicit permission. Describe the proposed change and intended audience. Agreement to remove a background distraction does not automatically cover changing someone's body or expression.
- Refuse sexualised or humiliating edits. Do not use image tools to impersonate, degrade, or create intimate images of another person without consent. Treat the request as harmful even if someone calls it a private joke.
- Apply stricter safeguards to children's photos. Get appropriate guardian permission, involve the child where suitable, and avoid public experiments with their images. Do not share edited photos of children as casual examples.
- Keep sensitive originals out of uploads. Avoid sending medical images, identity documents, intimate photographs, or pictures that reveal addresses or school details. Crop identifying information that is not needed for the edit.
- Restrict access and retention. Decide who can open the working folder and approve publication. Set a time to delete rejected candidates, and review the service's retention and deletion terms before uploading.
- Preserve evidence if abuse occurs. Keep relevant originals, messages, available prompts, timestamps, and screenshots of where the material appeared. Report the content to the hosting platform without redistributing the abusive image unnecessarily.
Understand the service boundary
Read 1chat's privacy policy before uploading personal material. 1chat's services cannot be used for child sexual abuse material, whether or not any portion is AI generated. They also cannot be used to automate high-stakes decisions in sensitive areas without human review.
A family-friendly service does not remove your responsibility to decide what to upload. Watermarks and provenance may indicate an image's origin, but they do not establish permission or legal responsibility. Record consent separately from the edit itself.
Build an Edit Log and Start With One Low-Risk Edit
A family photo or product shot can pass through several prompts before one version is ready to use. Keep the original, the approved result, and a short edit log together so family members or teammates can identify what changed and why. A spreadsheet or text file beside the working images is enough.
Edit log fields and why each one matters
| Log field | Why it matters | Example entry |
| Original file name | Identifies the source image | family_garden_original.jpg |
| Prompt text | Lets you repeat or review the edit | Remove blue bike; fill with pavement; keep face unchanged |
| Tool and model | Explains differences between results | Photoshop Generative Fill, version as shown under Help > About |
| Seed or variant ID | Identifies the candidate; may support reproduction where the tool allows it | Variant 3 of 4 |
| Reviewer decision | Shows who approved the image | Approved by office manager |
| Retry count | Reveals recurring failure modes | 2 retries before approval |
Turn the log into a useful habit
A filename identifies the source, but does not prove ownership or authenticity. A variant label helps locate a candidate, though it does not guarantee exact regeneration. Save the approved image itself rather than relying on prompt history.
When practical, keep the mask or editor project file with the log. Record a brief rejection reason for failed attempts, such as altered lettering, a broken reflection, or a visible boundary. Specific notes help the next reviewer identify what needs attention.
No image leaves the working folder without a recorded approval.
Start with object removal in a photo that contains no people, such as removing a cable beside a plain box. Once that process works reliably, try extending a simple background. Keep edits involving recognizable people for a workflow that consistently preserves details outside the requested change.
Review the log periodically. Repeated edge problems point to a masking issue; recurring changes to product geometry may call for manual retouching or a reshoot instead of more generations.
Choose a low-risk photo, make a working copy, and complete one narrowly scoped edit with a recorded approval. For a new illustration rather than an altered photograph, 1chat can generate AI images. Keep the source and final files distinct, and publish only an edit you can explain.