The Stability Diffusion API gives you direct, programmatic access to Stability AI's powerful image generation models. Think of it as the engine room for your creative projects, allowing you to build image generation right into your own apps, websites, or automated workflows. It goes far beyond what you can do with web-based tools like DreamStudio, giving you serious control and automation.
Your Quick-Reference API Guide
The Stability Diffusion API is what enables countless creative and commercial projects to scale. Instead of generating images one by one, an API lets you automate batch processing and integrate the technology seamlessly. This is a game-changer for small businesses, teams, and students who need to produce a high volume of creative work efficiently.
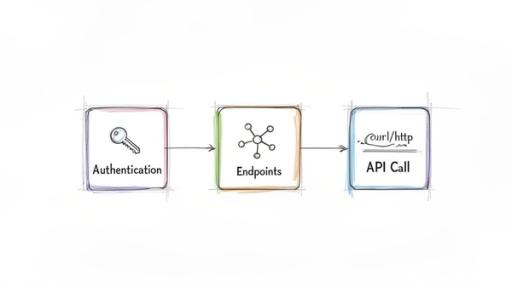
This guide is your map. Before we get into the code, it’s really important to get a handle on the core components you'll be working with. Every single interaction with the API follows a clean, logical sequence: authenticate your access, pick the right endpoint for the job, and then send your structured request.
Understanding The API Ecosystem
Since Stable Diffusion first appeared back in August 2022, it has become a cornerstone of the AI image generation space. The growth has been nothing short of explosive. In fact, enterprise API deployments have seen a massive 120% year-over-year increase through 2026, which shows just how many businesses are building on this tech. You can find more data on its market footprint and growth over at CompaniesHistory.com.
At its core, working with the API is all about control and efficiency. It flips image generation from a manual, one-off task into a scalable, automated process that can run entirely on its own.
To help you get oriented, here’s a quick-reference table that breaks down the fundamental concepts of the Stability Diffusion API. This summary covers the main components you’ll need to know before we dive deeper into each one throughout this guide.
Core API Concepts at a Glance
| Component | Description | Primary Use Case |
| Authentication | Verifying your identity with a unique API key sent in the request header. | Securing access and ensuring only authorized applications can use your credits. |
| Endpoints | Specific URLs that correspond to different API functions (e.g., text-to-image). | Directing your request to the correct service, like creating, editing, or upscaling an image. |
| API Call | An HTTP request containing your prompt, parameters, and authentication key. | The complete instruction sent to the server to generate or modify an image. |
Getting these three concepts down is the first step. Once you understand how they work together, you'll be well on your way to building incredible things with the API.
How to Authenticate and Set Up Your API Access
Before you can generate your first image, you need to prove to the Stability Diffusion API that you're a legitimate user. This is done through a process called authentication, which confirms your identity and lets the service know it's okay to use your account credits.
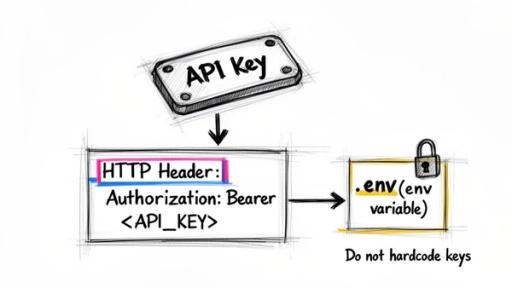
The whole system works using a unique API key. Think of it as a secret password just for your application. You have to include this key in every single request you make. If you forget it, the server will immediately shut you down with a 401 Unauthorized error.
Obtaining Your Stability AI API Key
Getting your hands on an API key is simple. You'll find it waiting for you inside your Stability AI account dashboard.
- Log In: Head over to the Stability AI Platform and sign in.
- Find API Keys: Once you're in, navigate to your account settings and look for a section called "API Keys."
- Copy Your Key: Your unique key will be displayed there. Copy it, and from this moment on, treat it like a password. Anyone who has it can make requests on your behalf and use your credits.
Once you have your key, the next step is adding it to your API calls correctly. This is all handled through a standard Authorization header.
Implementing Secure Authentication
Let me be blunt: never, ever hardcode your API key directly into your application's source code. It's a huge security mistake. A far better and industry-standard approach is to store the key as an environment variable. This keeps your sensitive credentials completely separate from your codebase, which is a lifesaver when you're working with public repositories or as part of a team.
Your request header needs to be formatted with your key presented as a Bearer token. This is a standard way of telling the server, "Here are my credentials, and they're in this format."
Here’s what that looks like in practice. Notice how both examples pull the key from an environment variable named STABILITY_API_KEY instead of pasting it into the code.
Python Example: import os import requests
A much safer way: load the API key from an environment variable
api_key = os.getenv("STABILITY_API_KEY")
Structure the headers with your Bearer token
headers = { "Authorization": f"Bearer {api_key}", "Accept": "application/json" }
Example API call (the specific endpoint will change)
response = requests.post(
"https://api.stability.ai/v1/generation/stable-diffusion-v1-6/text-to-image",
headers=headers,
json={...}
)
JavaScript (Node.js) Example: // Load the API key from your system's environment variables const apiKey = process.env.STABILITY_API_KEY;
// Prepare the request headers const headers = { 'Authorization': Bearer ${apiKey}, 'Content-Type': 'application/json', 'Accept': 'application/json', };
// Example API call using fetch in a Node.js environment // fetch( // 'https://api.stability.ai/v1/generation/stable-diffusion-v1-6/text-to-image', // { // method: 'POST', // headers: headers, // body: JSON.stringify({...}) // } // );
By following this setup, you'll have a secure and reliable connection to the API. Now you're ready for the fun part: making images.
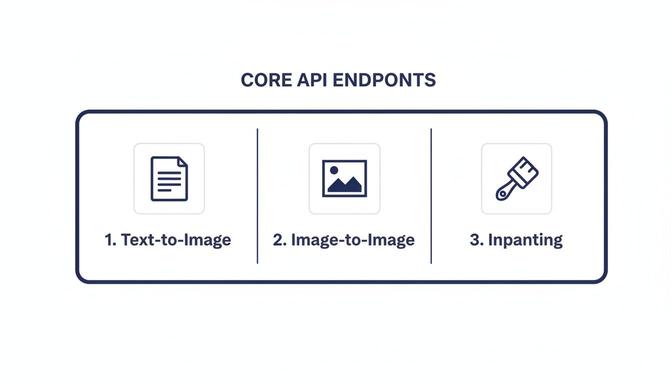
A Closer Look at the Core API Endpoints
Think of the Stability AI API as a workshop with different stations, each designed for a specific job. These stations are called endpoints. To get anything done, you have to send your request to the right one. Each endpoint knows exactly what kind of instructions it needs and what kind of result it should give back, making them reliable tools for building your application.
At its core, the API is all about creating and tweaking images. The most popular function is generating a completely new image from just a text description. But the real power comes from the more advanced tools that let you modify existing images, giving you a level of creative control that goes way beyond simple generation.
Getting a handle on these endpoints is your first real step. It helps you map out what your project can do, whether you're building a simple art bot for your family or a sophisticated photo editing tool for your small business.
Text-to-Image Generation
The text-to-image endpoint is the true workhorse of the API. This is where you feed it a descriptive text prompt and get a brand-new image in return. It’s the most straightforward way to bring an idea to life.
- Function: Creates an image based purely on a text description (
prompt). - HTTP Method:
POST - Use Case: Perfect for generating concept art, social media posts, product mockups, or any visual you can dream up from text.
To make it work, you just send a request containing your prompt and a few other parameters that fine-tune the final look. The API then gets to work and sends back the image data, usually as a Base64-encoded string you can use right away.
Image-to-Image and Inpainting
Creating from scratch is one thing, but what if you want to modify a picture you already have? That's where the image-to-image endpoint comes in. You give it a starting image and a new text prompt, and the AI reimagines your picture based on the new instructions. It's fantastic for changing the style of a photo or altering its mood while keeping the original composition intact.
A more precise version of this is inpainting. This technique gives you surgical control over your edits. You provide a "mask" file—basically a black-and-white guide that tells the AI exactly where to make changes. This allows you to add, remove, or replace objects seamlessly without touching the rest of the image. It’s an indispensable tool for professional-level photo restoration and editing.
Common Editing Endpoints:
| Endpoint | Function | Common Use Case |
| image-to-image | Re-renders an entire image based on a new prompt. | Changing a family photo into a watercolor painting. |
| image-to-image/masking | Modifies only the masked (specified) parts of an image. | Removing a distracting object from a product shot. |
| image-to-image/upscale | Increases the resolution and detail of an image. | Preparing a small AI-generated image for high-quality printing. |
These endpoints give you the power to go from initial concept to a polished final product. For example, a student could generate a base image for a history project with text-to-image, then use inpainting to place specific historical figures into the scene. This layered approach turns the API into an incredibly versatile creative partner.
Mastering the Generation Payload Parameters
The real magic of the Stability Diffusion API isn't just in the prompts you write—it's in the payload parameters you send with every request. These settings are the knobs and dials that give you precise control over the final image. Getting a handle on them is what separates creating a basic picture from producing truly intentional and repeatable artwork.
Think of it this way: your API call is a set of instructions. The prompt is the "what," but parameters like steps, cfg_scale, and sampler are the "how." Adjusting these values lets you guide the AI's creative process, balancing artistic flair with technical quality. For small businesses, teams, or even students, knowing your way around these controls is the key to churning out consistent, high-quality visuals without wasting time or credits.
Prompts and Negative Prompts
It all starts with the prompt and negative_prompt. Your prompt is the core instruction—what you want to see. The more descriptive you are about the subject, style, lighting, and composition, the closer the AI will get to your vision. For a much deeper look into writing effective prompts, our guide on how to generate images with AI is a great resource.
On the flip side, the negative_prompt is your "do not include" list. This is an incredibly powerful tool for steering the model away from common issues like mangled hands or a cartoony look when you're aiming for photorealism.
- Prompt Example: "A photorealistic portrait of an astronaut on Mars, golden hour lighting, sharp focus."
- Negative Prompt Example: "cartoon, painting, blurry, extra limbs, disfigured."
Using both gives you positive and negative reinforcement, which helps fine-tune the output with much greater accuracy. The infographic below shows the main API endpoints where you'll put these parameters to work.
As you can see, each endpoint tackles a different creative job, from generating an image from scratch to making detailed edits, and they are all driven by the parameters you set.
Steps, CFG Scale, and Samplers
Beyond the prompts, a few other parameters are absolutely crucial for controlling the generation process itself. This is where you can really start to dial things in like an expert.
steps: This number tells the model how many refinement iterations to run. More steps can add detail and polish, but they also take longer and cost more. We've found the sweet spot is usually between 20-30 steps, which offers a great balance of quality and speed for most images.
cfg_scale: The Classifier-Free Guidance scale dictates how strictly the model must follow your prompt. A low value (around 5) gives the AI more creative freedom, which can lead to interesting surprises. A higher value (like 10-12) forces it to stick very closely to your text. For general use, 7 is a solid, widely-recommended starting point.
sampler: This is the specific algorithm the model uses to denoise the image at each step. Different samplers produce subtle but distinct looks. You'll see options like DDIM, K_EULER_ANCESTRAL, and DPM++ 2M Karras. There's no single "best" one; it's more about personal preference. I recommend running the same prompt with a few different samplers to see which one creates the aesthetic you like best.
Key Parameter Effects and Recommended Values
To help you get started, here’s a quick-reference table breaking down the most important parameters, what they do, and where to start with your own generations.
| Parameter | Effect on Image | Recommended Range | Use Case Example |
| steps | Controls detail and coherence. Higher values add more refinement but increase generation time. | 20-50 | Start with 25 for quick drafts. Use 40+ for final, high-detail images. |
| cfg_scale | Determines prompt adherence. Lower values are more creative; higher values are more literal. | 5-12 | Use 5-6 for artistic, abstract concepts. Use 8-10 for photorealism or specific branding. |
| sampler | The algorithm for image generation. Affects the texture, style, and convergence. | N/A (Varies by model) | K_EULER for speed and variety. DPM++ 2M Karras for high-quality, stable results. |
| seed | The initial noise value. Using the same seed with the same parameters recreates an image. | -1 (random) or any positive integer | Set a specific number (e.g., 12345) to maintain character consistency across images. |
Experimenting with these combinations is the best way to develop an intuition for how they interact. A high cfg_scale might need more steps to look good, for instance.
Finally, don't forget the seed. This number is the starting point for the random noise that eventually becomes your image. If you use the same seed, prompt, and every other parameter, you will get the exact same image back every single time. This is absolutely essential when you need to create a consistent character, style, or scene element for a project. If you want a different image, just change the seed or set it to -1 for a random one.
Practical API Workflows with SDKs

While you can always communicate with the Stability Diffusion API using raw HTTP requests, the official Software Development Kits (SDKs) are the way to go. Honestly, they just make life easier. An SDK is essentially a ready-made toolkit for your preferred programming language that handles the tedious, behind-the-scenes work of making API calls.
The real value of an SDK is how it cuts out the grunt work. Instead of manually building out authentication headers, formatting JSON payloads, and parsing the server’s response, you just call a simple function. This saves a ton of time, but more importantly, it helps you avoid common, frustrating errors. For any small business, team, or student trying to get a project off the ground, that speed and reliability are a game-changer.
The developer-first approach has paid off. The ecosystem around the Stability Diffusion API is thriving, with over 2,500 unique applications built on it by 2026. These tools range from small, custom art generators to massive, enterprise-level image pipelines. You can dive deeper into how generative media APIs have evolved in this technical history on Flowhunt.io.
Core SDKs: Python and TypeScript
Stability AI provides official clients for the two languages that dominate modern development: Python and TypeScript/JavaScript. If you're building anything, these SDKs should be your starting point.
- Python SDK: The perfect choice for backend services, data science experiments, and simple automation scripts. It plays nicely with popular frameworks like Django and Flask.
- TypeScript/JavaScript SDK: Your go-to for creating interactive web apps, browser-based tools, or any server-side logic using Node.js.
Both SDKs offer a clean, straightforward interface for all the key API endpoints. Let’s take a look at just how simple a text-to-image generation becomes.
Example Workflow: Text-to-Image with Python
Here’s a copy-and-paste-ready Python example for generating an image. You'll immediately notice how the SDK hides all the complexity, letting you focus entirely on the creative parameters. This kind of clarity is incredibly helpful when you're just starting out or working with a team.
This streamlined workflow makes it incredibly easy to experiment. You can quickly tweak your prompts, change the number of steps, or play with other settings to see how they affect the final image. To really level up your results, take a look at our guide on what prompt engineering is for more advanced techniques.
By abstracting away the low-level HTTP details, SDKs empower you to write cleaner, more maintainable code. This means less time spent debugging API connections and more time creating amazing visuals for your family, team, or business.
The following Python snippet shows a complete, basic text-to-image generation. It handles authentication, sends a request with your chosen parameters, and saves the resulting image to a local file. Think of this as the foundational building block for almost any project you can imagine.
Understanding Costs, Pricing, and Rate Limits
Let's talk about the bottom line: how much does using the Stability AI API actually cost? The good news is that the pricing is built to be predictable. It’s all based on a simple credit system—you buy a block of credits upfront, and each API call you make consumes a certain amount.
This pay-as-you-go model puts you in complete control of your expenses. The exact number of credits you burn per request isn't a flat fee; it changes based on what you're asking the API to do. Think of it like paying for the exact amount of computational muscle you use.
How Credits Are Consumed
So, what determines the final cost of generating an image? It really boils down to a few key factors that influence how much processing power is needed.
The main variables are:
- Image Dimensions: This is a big one. Larger images like a 1024x1024 generation take significantly more work to create than a smaller 512x512 one, so they use more credits.
- Generation Steps: More steps generally produce a more detailed, refined image, but each additional step adds to the computational load and, therefore, the credit cost.
- Model Version: As Stability AI releases newer and more advanced models, you might find their credit costs differ from the older versions.
The economic case for this kind of API is pretty compelling. Across major markets, it's estimated that over 10 million users tap into these services daily, often seeing cost reductions of 75-85% compared to traditional licensed software. For a platform like 1chat, which is designed as an affordable ChatGPT alternative for families and teams, this allows them to offer powerful image generation without passing on a huge cost. You can get a sense of Stable Diffusion's broader market impact on its Wikipedia page.
Navigating API Rate Limits
To keep things running smoothly and ensure everyone gets fair access, the Stability API uses rate limits. These are essentially caps on how many requests you can send over a specific period. If you send too many requests too quickly, the API will politely tell you to slow down by returning a 429 Too Many Requests error.
Trust me, you'll want to build your application with these limits in mind from day one. It’s the key to preventing service disruptions and giving your users a reliable experience.
You can always check the official documentation for the exact rate limits tied to your account. As a practical tip, code your application to handle these limits gracefully. A common and effective strategy is to implement an exponential backoff, where your app automatically waits for increasingly longer periods before retrying a failed request. This stops you from hammering the API and allows your service to recover smoothly once the rate limit window resets.
Troubleshooting Common API Errors
Sooner or later, you're going to hit an error when working with the Stable Diffusion API. It happens to everyone, even with a flawless setup. The good news is that the API usually tells you exactly what went wrong through an HTTP status code.
Think of these codes as a direct message from the server pointing you to the problem. Instead of a dead end, they're your first clue for debugging. This section covers the most common errors you’ll run into, what they mean, and how to get back on track quickly.
Decoding Status Codes
When a request goes wrong, you'll get an HTTP status code back. While there are dozens of possible codes, you'll really only see a few of them on a regular basis with the Stability AI platform. Getting familiar with these will save you a ton of time.
Here are the usual suspects:
400 Bad Request: This is the most frequent error. It's a general-purpose signal that the server received your request but couldn't make sense of it.401 Unauthorized: This one is all about authentication. It means your API key is missing, incorrect, or doesn't have the right permissions.429 Too Many Requests: You've hit a rate limit. You're simply sending requests faster than the API allows for your account.
Let's dig into what each one means and how to fix it.
Resolving Specific Errors
A 400 Bad Request almost always means there's a problem with the data you sent in the request body, or payload. Your first move should be to double-check every single parameter. A simple typo like sampler instead of sampler or providing a value that's out of bounds (like steps: 151 when the max is 150) are common culprits.
Pro Tip: When a400error occurs, the API often includes amessagefield in the JSON response. Always log or inspect the full response body—it can literally tell you "parameterstepsmust be between 10 and 150," saving you from guessing.
If you run into a 401 Unauthorized error, the issue is your API key. First, make sure you're including the Authorization header correctly. The value needs to be formatted exactly as Bearer YOUR_API_KEY, with that space after "Bearer". If the format is correct, head back to your Stability AI dashboard and confirm the key is still active and that you've copied it without any extra spaces or missing characters.
Finally, seeing a 429 Too Many Requests error is pretty straightforward. You're being throttled. The most robust way to handle this is to implement an exponential backoff strategy in your application. This just means you programmatically wait a short time before retrying a failed request, then double that waiting period for each subsequent failure. It’s a graceful way to give the API a breather and let your application recover without crashing.
Safety Moderation and Privacy
When you're building with a tool as powerful as the Stability Diffusion API, especially for an audience of small businesses, students, or families, safety has to be front and center. Stability AI gets this, which is why they’ve built safety measures directly into the API to help you innovate responsibly.
The first line of defense is the built-in safety filter. This system automatically checks both your text prompts and the resulting images for any not-safe-for-work (NSFW) content. If it spots a problematic request or an image that goes against their policy, it simply blocks the output and returns an error. This is an essential safeguard that prevents harmful content from ever making it to your users.
Understanding Usage Policies
Beyond the automated filter, everything you do with the API falls under Stability AI's Acceptable Use Policy. It’s worth reading, as it clearly defines what kinds of content and use cases are off-limits. The main idea is to prevent the API from being used to create anything harmful, illegal, or unethical.
Here are the key things to keep in mind:
- No Harmful Content: You cannot generate images that are violent, hateful, harassing, or that encourage self-harm.
- Respect for Privacy: Creating deceptive images of real people or any non-consensual imagery is strictly forbidden.
- Legal Compliance: The API is not a tool for illegal activities, like generating fake documents or spreading disinformation.
Following these rules isn't just about staying compliant; it's about protecting your users and your own brand's reputation.
API Privacy and Data Handling
One of the biggest advantages of using the Stability Diffusion API over public web-based tools is privacy. When you make an API call, your prompts and the images you generate are processed just to fulfill that request. They are not used to train the public models.
This self-contained approach is a huge deal. It means your creative work and intellectual property stay yours. The API functions as a secure black box, processing your data without feeding it back into a global training set, which is crucial for both businesses and personal users.
The API provides a secure pipeline for your work by default. If you're interested in broader best practices, you can learn more about how to protect your privacy online from our in-depth guide. This mix of built-in filters, clear policies, and a privacy-first design gives you the confidence to build amazing things.
Frequently Asked Questions
Once you get past the initial setup, a few common questions always pop up. Here are answers to the practical problems and strategic decisions that developers and teams face when working with the Stability Diffusion API.
Can I Use the API for Commercial Projects?
Yes, absolutely. The Stability Diffusion API was built with commercial use in mind. You are encouraged to integrate it into your business applications, SaaS products, marketing tools, or any other commercial venture.
The one thing you absolutely must do is read the official Terms of Service from Stability AI. They spell out the specific rules for commercial use, including content restrictions and any licensing details you need to know. Staying on top of these terms ensures your project won't run into legal trouble down the road.
How Do I Ensure Consistent Style or Characters?
Getting a character or a specific style to look the same across multiple images is a classic challenge. The secret lies in controlling the AI's starting point and giving it very specific instructions. You'll need to master two parameters: seed and your prompt.
Think of the seed parameter as the unique starting point for the generation process. By using the exact same seed number for different API calls, you're telling the model to begin with the same initial noise pattern. This is the single most important factor for creating visual consistency.
Of course, the seed needs a great prompt to work with. Don't just say "a man." Get specific: "a man with short brown hair, wearing a red jacket and blue jeans, illustrated in a flat vector style." This locks in the core attributes.
Here’s a simple workflow for it:
- Pick a fixed
seed: Choose a number, like42, and stick with it for every image of that character. - Write a "base" prompt: Create a detailed template that defines your character's unchanging features.
- Vary the action: Tweak the part of the prompt that describes what the character is doing or where they are.
This technique is a game-changer for telling stories, building a brand mascot, or any project that needs a recognizable subject in different scenes.
What Is the Difference Between the API and DreamStudio?
It's a common point of confusion, but the distinction is simple. Both are official tools from Stability AI, but they are designed for completely different users and tasks.
DreamStudio is a website, a creative tool for people. You go there, type in prompts, and generate images one by one. It’s perfect for brainstorming, experimenting, and making a few images for yourself.
The API, on the other hand, is a tool for developers to build with. It's not an interface you use directly but a service you connect your own software to. It’s all about automation and integration.
The core difference is this: DreamStudio is for making images; the API is for building systems that make images.
Using the API lets you:
- Automate: Generate thousands of images from a spreadsheet or user inputs without a single click.
- Scale: Serve a large user base with on-demand image generation, which is impossible to do manually.
- Customize: Design a totally unique workflow and user experience for your own application.
- Integrate: Connect image generation to other services, like pulling product data from your store to create ads.
How Can I Optimize API Calls to Reduce Costs?
Managing costs is crucial, especially as your project grows. Since API pricing is tied to the credits used for each generation, a few smart adjustments can make a huge difference to your monthly bill.
The main strategy is to find the sweet spot between image quality and credit cost. You don't always need the highest-quality settings, especially during development or for previews.
Here are some practical tips to lower your spend:
- Generate Small Previews First: Don't burn credits on a full-size image right away. Generate a smaller, cheaper version first (e.g., 512x512 pixels). This lets you or your user check if the prompt is working as expected before committing to the expensive, high-resolution final version.
- Test with Fewer Steps: The
stepsparameter is a major factor in both cost and generation time. Find the lowest number of steps that gives you "good enough" quality for your needs. An image with 20 steps is often perfectly fine for a draft and costs much less than one with 50 steps. - Implement Caching: This is a big one. If a user tries to generate an image with the exact same prompt and settings as a previous request, don't make a new API call. Serve the image you already generated from your own storage (a cache). This completely eliminates redundant costs.